Additional Report Options
The Accounting Reports Options screens will contain additional tabs that offer selections you can make to adjust certain aspects of your Reports. Use these tabs to further specify the type and appearance of the report data. Review and make any desired selections from whichever of the following tabs are available on your report:
 Custom Account Groups
You can customize the report to show only the accounts and/or funds associated with specific Custom Account Groups.
- Choose any or all desired Custom Account Groups, you can select whatever desired custom account groups individually.
- Click Select All to place a check next to all options.
- Click Clear All to remove all check marks.
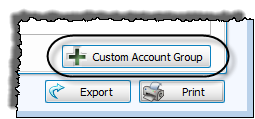
- Or click the + Custom Account Group button to create a new set of accounts.
Group & Sort (or Sort tab)
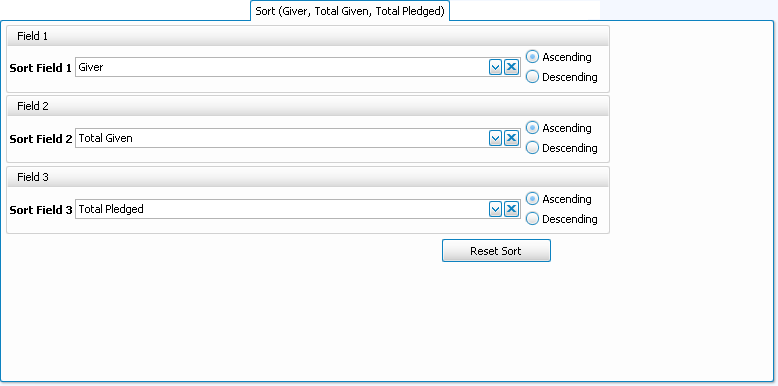
Use this tab to sort the results by up to three columns (sort fields). Whether you are viewing the Group & Sort tab, or the Sort tab, use the following options to change the order of the contents of your list:
- Sort Fields:
Choose the name of the field(s) by which to sort the contents of the report:- The field chosen in Sort Field 1 will sort the entire list by that field first.
- Then, choose a field from Sort Field 2 if you want sort the list further within the order chosen in Sort Field 1.
- To sort the list in an additional order within the order chosen in Sort Field 2, choose a field from Sort Field 3.
For example, you could choose Zip Code for Sort Field 1, then within each Zip Code you could make Sort Field 2Status Code, then within each Status Code grouping you could sort by Name for Sort Field 3.
- Ascending & Descending:
Choose the order in which you want the contents to be sorted:- Ascending — lowest to highest / alphabetical
- Descending — highest to lowest / reverse alphabetical
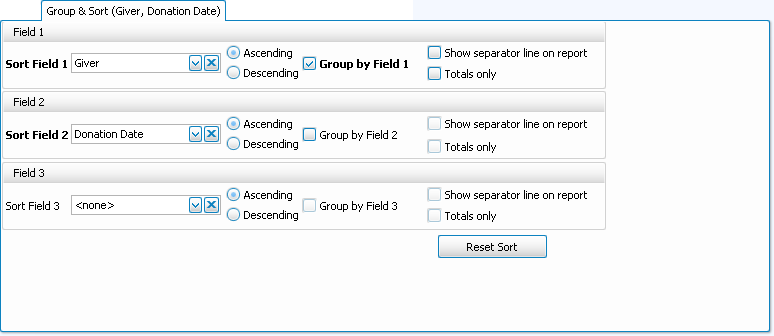
The following choices appear only on the Group & Sort tab, place a  checkmark in the box to select that option:
- Group by Field — Group the contents of the report by the item selected in that sort field.
- Show Separator Line on Report — Show a short horizontal line in between each grouping of information.
- Totals Only — Show only a total to represent the donations grouped by the selected sort field.
Click the Reset Sort button to change the selections back to their original state.
Columns / Fields tab
The Column Selector or Columns Tab allows you to decide which fields from The Individual Record or The Family Record will be visible on the report and which will not be visible.
On the left hand side Available Columns are the columns that are not showing but are available to be shown if desired. On the right side Visible Columns are the columns that are currently selected to be shown:
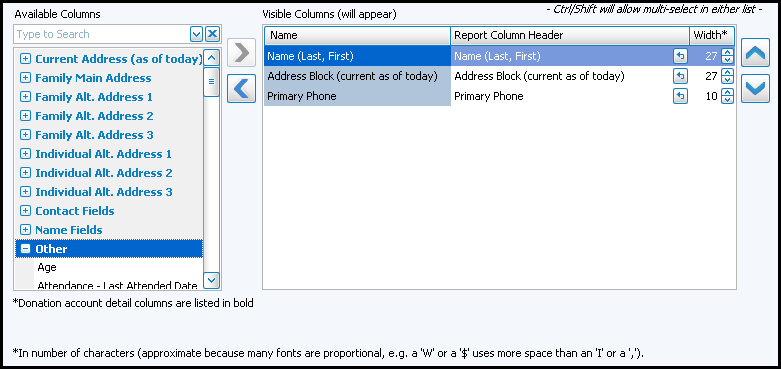
- If needed, to browse the Available Columns, click the
 to expand a group of fields or use the "Type to Search" dropdown
  box to choose a column.
 - You can either highlight the column and use the
 left and
  right arrow buttons to bring it back and forth, or double click on it to move it to the opposite side of the screen.
 - Use the
 up and down arrow buttons to rearrange the order of the columns.
 - Underneath the Visible Columns on the right is a space for the "Report Column Header". You can edit this text to label that field differently on your printed / exported report without changing the actual column name in the database.
For example, you could remove "(current as of today)" from the Address field's Report Column Header, as it would likely be unnecessary to include on the report.
- Each column is set to print at a certain column width automatically. You can also change the width of the columns that show on the report. Raise or lower the number in the Width* column according to your preference.
- Click OK when you are satisfied with your column selections.
- You can click on the 'Select Fields' button to the right of the report name dropdown list to reopen the Column Selector and make additional changes later.
Detail tab
Show or hide any of the balances of any Subtotals from the report by making selections on the Detail tab. Click the expand button to the left of each row to view details (when expanded it will become a  collapse button). Click the Detail checkbox to show the Accounts / Subtotals item on the report, or click to remove the
  checkmark and hide the item.
Fonts tab
Change the size and style of the font that prints on the report by clicking the Fonts tab, choosing the Page Header, Column Headings, and/or Body Text settings, and applying your selections.
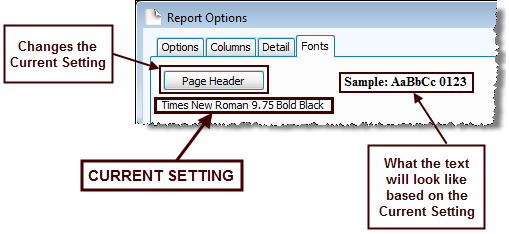
Choose the setting for the item you wish to change, and another screen will appear for you to change the font.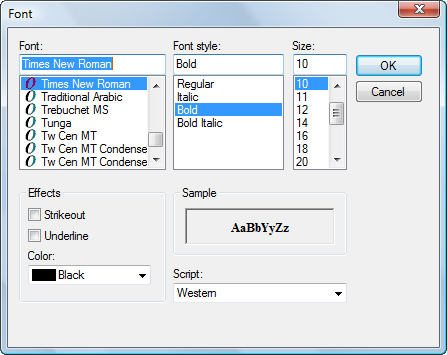
Change to the desired font settings and click OK. When you click OK, a sample set of text will show you how the report text will print due to the selections you made. Click Reset to Default to change all fonts to their original settings.
Funds tab
The report will show only the funds and their associated accounts found in the Selected Accounts list. Otherwise, the fund name will appear in the Available Accounts list, and all its accounts will not show on the report.
- To add an Available Account, click it once to select it.
- Then, click the right button to place the account in the Selected Accounts list.
- To remove a Selected Account, click it once to select it.
- Then, click the left button to place it in the Available Accounts list.
- Click Select All to place all accounts in the Selected Accounts list, or click Unselect All to place all accounts in the Available Accounts list.
Once you have made all of your selections, click Print to view a Print Preview and then proceed in sending the file to your printer. You can also Export most reports and/or Send via Email as a file to be used outside of Church Windows.
